Tag: Home Cinema Design

  • Why Acoustic Panel Placement Isn’t Random: Understanding First Reflection Points

    SMART Home Cinema ยท Engineering Series

    First reflection points: why panel positions are calculated, not chosen

    In a home cinema, a panel on the wrong part of the wall is decoration. Here is how the correct position is worked out โ€” and why the back row needs a different answer to the front row.

    Worked Example ยท Mirror-Image Method

    First reflection points are the reason two identical rooms, fitted with identical panels, can sound completely different. The points are not a matter of taste or symmetry. They are geometry, they can be calculated to the inch before anything is built, and they move the moment a seat moves.

    Most acoustic treatment in Indian home cinema rooms is installed without anyone working them out. The panels are real, the material is real, and the positions are guesses. This article is about how the positions are actually derived โ€” and what a room loses when they are not.

    Why is most of what you hear not the speaker?

    In an untreated room, most of the sound energy reaching your seat has bounced off something first. The direct sound โ€” the part that travels straight from the driver to your ear โ€” is the minority of what arrives, and in a small, hard-surfaced room it is a small minority.

    You do not hear those reflections as separate events. They arrive within a few thousandths of a second of the direct sound, and your ear fuses them into one. What they do instead is change what you hear: detail smears, dialogue loses its edge, voices drift away from the actor’s mouth on screen, and the sense of space collapses.

    So reflection control is not a refinement applied after the system already sounds good. It is most of the sound.

    How is a first reflection point found?

    Hang a mirror on the side wall of your cinema and sit down. You will see the speaker reflected at exactly one spot on the glass. That spot โ€” and only that spot โ€” is where sound from that speaker bounces off that wall into your ear. Slide the mirror along the wall and the reflection appears somewhere else on it. Move your head and the spot moves too.

    Sound obeys the same rule. Angle in equals angle out.

    How a first-reflection point is located Section through a home cinema. The speaker’s mirror image is shown above the ceiling. A straight line from that mirror image to the listener’s ear crosses the ceiling at 8 feet 3 inches from the front wall, which is the reflection point. The real sound path runs from the speaker up to that point and back down to the ear. How a reflection point is found Section through the room. The bounce point is not chosen — it is where the geometry puts it. MIRROR SPACE (above the ceiling) Mirror image of the speaker same distance above the ceiling as the real one sits below it direct sound angle in angle out Speaker Listener’s ear Reflection point — 8′-3″ from the front wall A panel here works. A panel two feet away does not. room 26′-8″ long · ceiling 11′-0″ · worked example
    The reflection point is not chosen. It is where the straight line from the speaker’s mirror image to your ear crosses the surface.

    Two things follow from this, and they are the whole argument:

    1. The point can be calculated to the inch, before anything is built.
    2. It is a different point for every combination of speaker and seat.

    Why do row 1 and row 2 need different panel positions?

    Take a worked example. 26′-8″ long, 16′-0″ wide, 11′-0″ ceiling. Two rows, the back row on a 1′-2″ riser.

    Ceiling bounce, measured from the front wall
    PathDistance from front wall
    Front stage โ†’ row 18′-3″
    Front stage โ†’ row 212′-4″
    Separation4′-1″

    Those two points are 4′-1″ apart. That is not a rounding error; it is wider than the panel.

    Now consider the two things people usually do:

    • Cloud centred over the seating. This is the intuitive choice, because that is where people sit. It catches neither point. Both rows keep an untreated ceiling bounce.
    • Panels centred on row 1’s point. The front row is treated. The back row is not. Same room, same system, same evening โ€” and the back row gets a narrower image and less intelligible dialogue than the front. Clients notice this. They usually describe it as “the sofa sounds better than the recliners” and assume it is the seats.

    The band has to be dimensioned to hold both points, plus the panel width around each. In this room that means a ceiling band running 8′-0″ to 12′-6″ from the front wall, with the front edge fixed on the drawing rather than centred by eye.

    Two seating rows produce two separate ceiling reflection points Section through a home cinema with two rows. Sound from the front speakers reaches row one via a ceiling bounce 8 feet 3 inches from the front wall, and reaches row two via a separate bounce at 12 feet 4 inches. The calculated treatment band spans 8 feet to 12 feet 6 inches and holds both. A cloud placed over the seating instead catches neither point. Row 1 and row 2 do not share a reflection point Two seats, one front stage, two different bounce points on the ceiling — 4′-1″ apart. cloud placed “over the seats” — catches neither point Calculated band: 8′-0″ to 12′-6″ front edge fixed on the drawing 8′-3″ 12′-4″ riser 1′-2″ LCR + screen Row 1 Row 2 11′-0″ 26′-8″ · front wall → rear wall · worked example
    One front stage, two seats, two separate bounce points 4′-1″ apart. A cloud placed “over the seats” catches neither.

    How many reflection points does one room actually have?

    The ceiling was the simple case. Every hard surface gets the same treatment, for every speaker, for every seat.

    On the right-hand side wall of that same room, taking the centre seat of each row and the three front channels only:

    Side-wall reflection points, from the front wall
    Reflecting speakerRow 1 pointRow 2 point
    Left10′-0″14′-1″
    Centre8′-3″11′-6″
    Right4′-7″6′-1″

    Six points spread across a 9′-6″ band. Not a patch beside the speaker, which is where side-wall panels usually end up.

    Six first-reflection points along one side wall Plan view of a home cinema. Plan view looking down, front wall at the left, so the audience faces left and the wall shown at the top of the drawing is the listener’s right-hand wall. The left, centre and right speakers each reflect off that wall into the centre seat of row one and the centre seat of row two, giving six points between 4 feet 7 inches and 14 feet 1 inch from the front wall. The points span 9 feet 6 inches; the treated band, sized to the panel module, runs 4 feet 6 inches to 14 feet 3 inches, or 9 feet 9 inches. One side wall. Three speakers. Two rows. Six points. Plan view. The zone to be treated is a band the length of the seating, not a patch beside the speaker. the usual guess treated band 4′-6″–14′-3″ (9′-9″) points span 9′-6″ 4′-7″ 6′-1″ 8′-3″ 10′-0″ 11′-6″ 14′-1″ row 1 row 2 R C L Row 1 Row 2 opposite side wall — the mirror set, shifted Centre seats only. Add the outer seats in each row and this one wall carries 18 points. Room 26′-8″ × 16′-0″ · worked example.
    Three front channels reflecting off one side wall into two rows. The six points span 9′-6″. The treated band, sized to the panel module, runs 4′-6″ to 14′-3″ โ€” 9′-9″.

    The points have a height as well as a position

    Everything above locates points along the length of the wall. They also sit at a height, and the height moves for the same reason the position does.

    Where the speaker and the ear are level, the reflection point sits at that same height. Row 1 is at seated ear height, so all three of its side-wall points land at 3′-6″. Row 2 is on a riser, so its ear is above the speaker and its points climb: 3′-9″ from the nearest channel, 4′-1″ from the centre, 4′-3″ from the furthest.

    That spread — 3′-6″ to 4′-3″, nine inches across the six points — is why a side-wall band has a dimensioned height and not just a dimensioned length. Nine inches is easily covered. Raise the riser, add a third row, or bring in height channels, and the spread grows until a band whose height was chosen by eye starts missing the points at its edges.

    Add the outer seats and that one wall carries 18 points. Across the four reflecting surfaces:

    18
    Left wall
    18
    Right wall
    18
    Ceiling
    18
    Floor
    72
    Total, front three channels only

    And that is the front three channels alone, before the surround and height layers are counted.

    Nobody holds 72 coordinates in their head on site. That is the entire practical reason we draw the room first.

    Most rooms are not treated badly. They are treated without ever having been drawn โ€” panel positions decided on site, on the day, by eye. The reflection points existed either way; nobody worked out where they were.

    Send us your room dimensions on WhatsApp โ†’

    Position is half the job. Depth is the other half.

    A panel in exactly the right place, made too shallow, still fails. It absorbs the top of the band and reflects everything underneath, which tilts the room’s tonal balance rather than correcting it.

    The variable that matters is not the panel’s thickness. It is the effective depth โ€” panel thickness plus the air gap behind it. A porous absorber works by slowing moving air, and air moves fastest at a distance from a hard wall, not at its face. Mount the same panel on battens and you move it out into that faster-moving air, where it behaves closer to a thicker panel than it measures.

    Deeper reaches lower, and the relationship is close to inverse: double the effective depth and you roughly halve the frequency the absorber still controls. The figures below are the trade’s working approximations for specifying, not measurements โ€” what a given panel actually does depends on the material’s flow resistivity and how it is mounted, and the only ways to know are its own test data or a measurement of the finished room.

    Effective depth against lowest useful frequency
    Effective depthControls down to approximately
    50 mm500 Hz
    100 mm250 Hz
    125 mm200 Hz
    150 mm167 Hz
    200 mm125 Hz

    A 100 mm panel screwed flat to the wall gives 100 mm of effective depth and controls to roughly 250 Hz. The same panel on 50 mm battens gives 150 mm, and reaches about 167 Hz โ€” a third lower, from the same panel. Doubling the effective depth halves the frequency, so a full octave costs a batten as deep as the panel itself. That decision โ€” battens rather than adhesive โ€” is the step most installations skip. The panels are identical. The mounting is not.

    Which is why effective depth belongs on the drawing and not only on the panel spec. It changes how far the assembly stands off the wall, and that has to be coordinated with the finish, the skirting and the seating line before anything is ordered.

    What about diffusers?

    Scattering devices follow the same logic through a different mechanism. The depth of a diffuser’s wells sets the lowest frequency it scatters; everything below that passes as though the device were a flat wall. A shallow diffuser is not a failed diffuser โ€” it is a device with a high cut-off, and it belongs on surfaces where only the upper band needs scattering. A deeper one belongs where the scattering has to reach further down. Depth is a placement decision, not a quality grade.

    One thing carries across only partly. Behind a solid, rigid-backed diffuser an air gap changes nothing you can hear: the wells are already the depth, and a rigid back on battens scatters the same as one on adhesive. That holds only for a solid back. A slotted or open-backed device with a cavity behind it becomes a resonant absorber as well as a scatterer, and then the gap is an acoustic decision rather than a styling one. Which of the two you are holding is worth establishing before the batten depth is fixed.

    Why is it wrong to absorb everything?

    This is where a lot of rooms fail in the opposite direction. Covering every surface in absorption is not the safe option. Your brain expects a room to sound like a room; strip the reflections out completely and the result is oppressive and airless, voices lose body, and the sound collapses inward as though you were wearing headphones.

    There is no coverage percentage that answers this. Coverage is solved backward from the room’s target decay time, then checked surface by surface. You start from the decay the finished room has to achieve, work out how much absorption that volume needs to reach it, distribute that across the surfaces carrying reflection points, and verify the result by measurement rather than by area.

    Two rooms of identical floor area can need very different quantities. A room with a plastered ceiling, a tiled floor and glass down one wall starts from a completely different place than one with carpet, a fabric ceiling and masonry. A percentage rule cannot see that difference. A decay target can.

    Distribution matters as much as quantity. A room can carry the right total absorption and still have one bare wall doing all the damage, because a reflection point left untreated is untreated regardless of what the rest of the room is doing.

    The rules that follow

    • Ceiling first reflections are absorbed, always. A ceiling bounce arrives at both ears at the same instant, so it pulls the image into a narrow band above the screen instead of spreading it across the front wall.
    • The centre of the back wall is absorbed. A scattering panel directly behind the main seat collapses the rear image.
    • Scattering belongs in the rear portion of the room, roughly from halfway back, not immediately behind the speakers.
    • Absorption and scattering are interleaved through that rear section. All-soft-at-the-front, all-hard-at-the-back is a well-known layout and a poor one.
    • The front half is symmetric, left to right. First-reflection treatment on one side wall is matched on the other. Asymmetric absorption at the reflection points pulls the image toward the harder side, and it is one of the fastest ways to lose a centred image on a system that measures well otherwise.
    • The rear half does not have to match. Scattering behind the seating can differ side to side. Feeding both ears an identical scattering pattern narrows the sense of width, and the rear half is the one place in the room where deliberate difference helps rather than hurts.
    • Floor bounce is the one reflection point you cannot put a panel on. Carpet over underlay is the only treatment the floor can carry, and it is thin โ€” 12โ€“13 mm of carpet on 10 mm of underlay is about 23 mm of effective depth, which by the rule above means meaningful absorption only from roughly 1 kHz upward. That is not the whole floor bounce. It is the part carrying consonants and image focus, which is why a hard-floor cinema is fighting the room from the first day and why carpet is not optional. The rest of the floor bounce is not absorbed at all. It shows up as a cancellation notch, and in a room of these proportions that notch falls somewhere in the 300 to 500 Hz region โ€” well below anything carpet touches. Its frequency is set by the speaker’s height and the ear’s height, which means it can be placed but not removed. That makes both heights a decision taken on the drawing rather than a consequence of whatever furniture arrives.
    • Absorptive panels are hung as matched pairs. A single panel hanging alone is visible, and it is usually the sign of a count that was fitted rather than designed.
    Which surfaces are absorbed, scattered, and left reflective Section through a home cinema showing the job of each surface. The ceiling absorbs across the first-reflection band and scatters from three quarters of the room length back. The side walls absorb across the reflection band, then interleave scattering and reflective sections from about halfway back. Front and rear corners carry low-frequency traps, the front wall absorbs behind the screen, the rear wall absorbs at its centre and scatters outboard, and the floor is carpet over underlay, which absorbs only the upper part of the floor bounce. Not everything gets absorbed Each surface has a job. A room covered wall to wall in absorption fails for the opposite reason. CEILING absorb the reflection band scatter — from ¾ of the room length SIDE WALL absorb — reflection band 4′-0″ tall · 2′ to 6′ above floor live scatter live scatter scatter interleaved with live from halfway back — never one solid block bass trap FRONT WALL absorb behind the screen bass trap REAR WALL absorb at centre, scatter outboard FLOOR — carpet and underlay reach only the top of the band, about 1 kHz up row 1 row 2 absorb scatter leave live low-frequency trap Front wall on the left. Proportions indicative; every band is dimensioned on the room’s own drawings.
    Each surface has a job. Ceiling scattering begins about three-quarters of the way back; side-wall scattering from roughly halfway. Absorb, scatter or leave live is decided by position, not by how much material is left over.

    Why do the same rules not work for bass?

    Below roughly 150 Hz the mirror rule stops being useful. At those frequencies the room stops behaving like a set of rays bouncing off surfaces and starts behaving like a resonator: fixed patterns of loud and quiet, set by the room’s own dimensions, standing still in the air.

    The consequence is severe and routinely underestimated. A seat sitting in the wrong part of that pattern can lose 20 to 40 dB at a given frequency. A 40 dB loss is 99.99% of the energy gone at that note. Move the seat two feet and the answer changes completely.

    So bass is a placement problem too โ€” but what is being placed is the seats and the subwoofers, not the panels. Every room mode reaches a pressure maximum in the corners, which is why the corners carry the deepest traps: that is where they earn their depth at the lowest frequencies. Higher up, through the 100โ€“250 Hz band, the wavelengths are short enough to be caught on the surfaces themselves โ€” front wall, side walls, riser and rear wall โ€” which is where that band is treated instead. And multiple subwoofers in calculated positions do more for bass evenness across a row than any quantity of absorption.

    This is also why “we’ll add bass traps later if it sounds boomy” is backwards. By then the seats are fixed, the riser is built, and the simplest fix has been designed out.

    What does a calculated design look like on paper?

    A room that has been designed rather than decorated produces a specific set of documents before anything is ordered:

    • reflection points listed per surface, per speaker, per seat โ€” in feet and inches from the front wall
    • treatment bands dimensioned on scaled wall elevations and a ceiling plan, not described in words
    • panel type and effective depth against each position, batten depth included, so the installer is not choosing on the day
    • coverage checked surface by surface against the room’s target decay time
    • a visible flag against any position that had to move for a door, window or opening โ€” moved on the drawing, never silently on site
    • setting-out drawings for the site team, so what gets marked on the wall matches what was calculated

    If a design does not produce those, the positions were not calculated. They were estimated, and the estimate will be found by the back row.

    How much of that a project gets

    That is a budget decision, and it should be an explicit one. A full set โ€” every surface, every speaker, every seat, dimensioned and set out โ€” takes design time, and design time is real cost. On a reference-level room it is a small fraction of the total and there is no argument for skipping it. On a smaller room it is scoped down: fewer seat positions calculated, elevations drawn for the surfaces carrying the most points rather than for all of them.

    What does not get scoped down is the derivation. Reflection points are either calculated or they are not. A reduced drawing set still starts from calculated positions โ€” it simply documents fewer of them. The failure this article is about is not a thin document set. It is no calculation at all.

    A band calculated to catch both rows begins to miss the outer seats first as it drifts, which is why the setting-out is dimensioned rather than described.

    Who is this approach for?

    There is no shortage of people in India who will build you a beautiful cinema room. Most of them begin from the interior: the layout is set, the finishes are chosen, the lighting is designed, and the acoustics are fitted into whatever space is left over. That order produces rooms that photograph well and measure badly, because by the time anyone asks where the reflection points are, the seats and the ceiling are already fixed.

    We work in the opposite order. Room dimensions, speaker positions, seat positions and riser height are settled first, because those four things determine every panel position in the room and every one of them is expensive to change afterwards. The interior is then designed to that geometry, rather than the geometry being squeezed into the interior.

    This is not a choice between a room that performs and a room that looks right. It is a question of which one is decided first.

    A cinema designed acoustically and then finished properly ends up as both. A cinema designed visually and then treated ends up as one.

    So the filter is simple. If the finishes have to be locked before the acoustics are worked out, we are the wrong people to call โ€” not because the finishes do not matter, but because that order forecloses every decision this article is about. If the room’s performance is allowed to set the geometry, and the interior is designed to it, that is the whole of what we do.

    What three questions should you ask any installer?

    1. Where are the first reflection points for the back row? In feet and inches, from the front wall.
    2. What is the effective depth of the panels, and what frequency does that depth control down to?
    3. How was the coverage arrived at, and how is it distributed across the surfaces?

    If the answers are “we’ll sort it on site”, “standard”, and “as many as fit the walls”, you are buying wall panelling, not acoustics.

    The same logic runs through every stage that follows โ€” how a room’s decay target is set, how the room is drawn before anything is ordered, and how the finished result is verified by measurement rather than by ear. If your question is how much treatment a room needs in total, our sister brand covers that in detail: how much acoustic treatment a room needs.

    Frequently Asked Questions

    What are first reflection points in a home cinema?

    First reflection points are the exact spots on the ceiling, side walls and floor where sound from a speaker bounces once before reaching a listener’s ear. Each point is set by geometry โ€” the speaker position, the seat position and the surface between them โ€” so it can be calculated to the inch before construction starts. A room with three front channels and six seats has 72 first reflection points across the four reflecting surfaces, before surround and height layers are counted.

    How do you find the first reflection point on a wall?

    Sit in the seat and have someone slide a mirror along the wall. Where you can see the speaker in the mirror is the reflection point for that speaker and that seat. On paper the same result comes from the mirror-image method: draw the speaker’s reflection behind the surface, draw a straight line from that image to the listener’s ear, and mark where the line crosses the surface.

    Why do the front and back rows need different panel positions?

    Because the reflection point moves with the listener. In a 26′-8″ room with the back row on a 1′-2″ riser, the ceiling bounce for row one lands 8′-3″ from the front wall and the bounce for row two lands 12′-4″ โ€” 4′-1″ apart, wider than a panel. A cloud centred over the seating catches neither. The treatment band has to be dimensioned to hold both points plus panel width around each.

    How thick should acoustic panels be in a home theatre?

    Effective depth matters more than panel thickness. Effective depth is the panel plus the air gap behind it, and the relationship is close to inverse โ€” double the effective depth and you roughly halve the frequency the panel still controls. A 100 mm panel fixed flat to the wall gives 100 mm of depth and controls to about 250 Hz; the same panel on 50 mm battens gives 150 mm and reaches about 167 Hz. These are working approximations for specifying, not measurements. Real performance also depends on the material’s flow resistivity.

    What percentage of a room should be acoustically treated?

    There is no percentage that answers it correctly. Coverage is solved backward from the room’s target decay time and then checked surface by surface, because two rooms of the same size with different finishes need very different quantities. A room with a tiled floor, plastered ceiling and glass wall starts nowhere near a room with carpet and fabric. Distribution matters as much as total quantity โ€” an untreated reflection point stays untreated no matter what the rest of the room carries.

    Can acoustic panels fix bass problems?

    Only partly, and not by placement on reflection points. Below roughly 150 Hz the room resonates rather than reflecting like a ray, and a seat in the wrong part of that pattern can lose 20 to 40 dB at a given frequency. Corners carry the deepest traps because every room mode reaches a pressure maximum there. The 100โ€“250 Hz band is treated on the front wall, side walls, riser and rear wall. Seat positions and multiple subwoofers in calculated positions do more for bass evenness across a row than any quantity of absorption.

    Does acoustic panel placement have to be decided before construction?

    Yes. Deciding it afterwards costs more and constrains the result. Panel positions depend on seat positions, riser height, speaker positions and room dimensions โ€” all of which are fixed by the time the room is built. Deciding treatment afterwards means working around choices that were made without reference to the acoustics. Rooms designed this way carry reflection points per surface, per speaker and per seat, dimensioned on scaled elevations, before anything is ordered.

    Where does SMART Home Cinema design and install home cinema rooms?

    SMART Home Cinema is based in Anna Nagar, Madurai, and designs and installs across Tamil Nadu and South India. Projects in Madurai and the surrounding districts start from โ‚น8 Lakhs. In Tiruchirappalli, Coimbatore, Tiruppur and Salem, projects start from โ‚น20 Lakhs. Reference-level projects elsewhere across South India โ€” Karnataka, Kerala, Andhra Pradesh and Telangana โ€” start at โ‚น50 Lakhs. Every project begins with a demonstration at the Krix Reference Level Experience Center in Madurai before any quotation is issued.

    A cinema room is an instrument you sit inside

    Every panel position in it is derived from that specific room โ€” its dimensions, its speaker positions, its seat positions, its riser height. Change any one of those and every panel position changes with it.

    That is the whole reason we draw the room before anyone buys anything for it.

    Notes on the worked example

    All figures come from a single worked example, not a built project: 26′-8″ long ร— 16′-0″ wide ร— 11′-0″ ceiling; front stage 1′-6″ from the front wall at seated ear height; row 1 at 15′-0″ and row 2 at 21′-6″ from the front wall; row 2 on a 1′-2″ riser. Reflection points are calculated by the mirror method and rounded to the nearest inch. A different room gives different numbers โ€” that is the argument, not a caveat to it.

    Further reading

    Immersive audio room design is covered in the joint CEDIA / CTA RP22 recommended practice. Channel layout and listener-area geometry are documented by Dolby, and seating geometry and viewing-angle standards by SMPTE.

    A cinema room is designed once and lived with for a decade. The panel positions in it are not a finishing decision โ€” they are set by the room’s dimensions, its speaker positions and its seat positions, and they are far easier to get right on the drawing than on site.

    Home cinema in Madurai and the surrounding districts starts from โ‚น8 Lakhs, and from โ‚น20 Lakhs in Tiruchirappalli, Coimbatore, Tiruppur and Salem. Reference-level projects across South India start at โ‚น50 Lakhs. We do not quote without a demonstration.

    Discuss Your Project on WhatsApp โ†’
    Paul Joseph Klattan
    HAA Level 3 Certified | ISF Certified | Trinnov Certified
    Founder, SMART Home Cinema ยท Madurai, Tamil Nadu

    Paul designs and calibrates reference-level home cinema across South India, working from measurement rather than assumption โ€” REW with a calibrated microphone, seat-averaged target curves, and verified re-measurement after every change. He holds HAA Level 3, the highest level of the Home Acoustics Alliance programme, and runs the Krix Reference Level Experience Center in Madurai, one of the few properly calibrated immersive audio environments in South India.

  • Why Your Home Cinema Seat Matters More Than Your Subwoofer

    Why Your Home Cinema Seat Matters More Than Your Subwoofer

    Why Your Home Cinema Seat Matters More Than Your Subwoofer | SMART Home Cinema
    SMART Home Cinema ยท Engineering Series

    Why Your Home Cinema Seat Matters
    More Than Your Subwoofer

    A bigger subwoofer cannot move a cancellation. Moving your chair can. The physics that decides how bass behaves in a room โ€” and why seating is planned before equipment is chosen.

    CEDIA/CTA-RP22 REFERENCED

    Almost every enquiry we receive about weak or boomy bass opens the same way: which subwoofer should I upgrade to. It is a reasonable question and it is usually the wrong one. In a closed room, home cinema seat position changes what you hear at low frequencies more than most equipment decisions do.

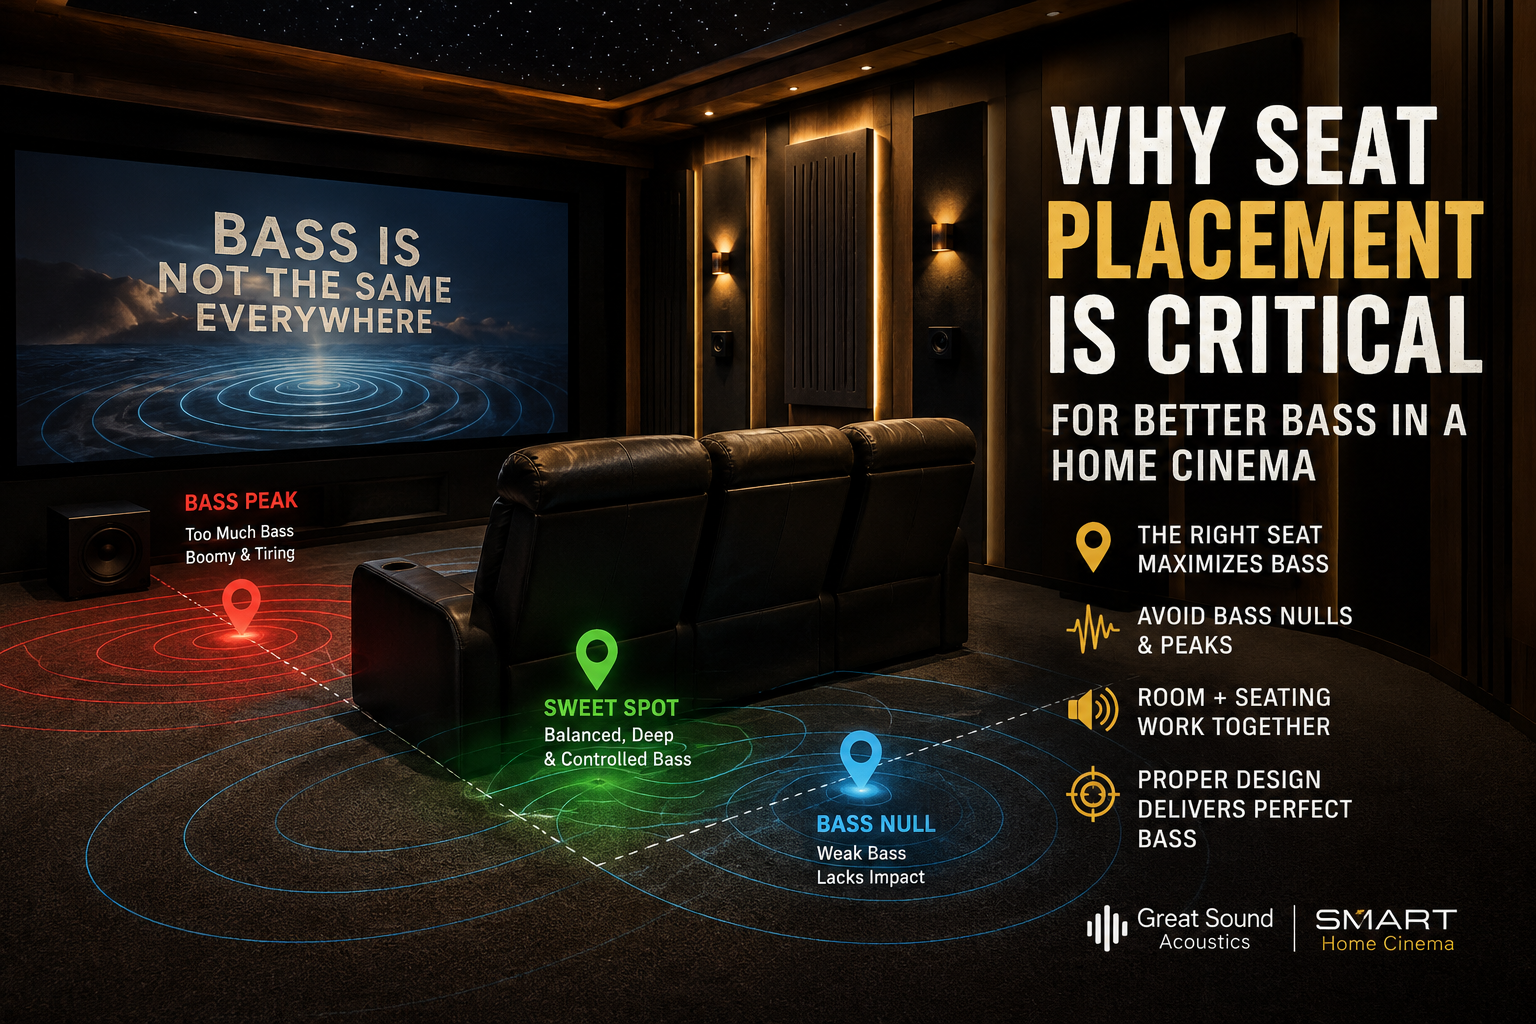
    Low frequencies do not simply travel from the driver to your ears. They bounce, return, and interfere with themselves. That interference creates a fixed pattern of strong and weak zones across the floor plan. Your chair sits somewhere on that pattern, and where it sits decides how much bass reaches you.

    The seat is not furniture. It is the last component in the signal chain โ€” and the only one that costs nothing to get right, provided you decide it early enough.

    Why does the same room sound different in every seat?

    Low frequencies are long waves. A 30 Hz tone measures roughly 11 metres from one crest to the next โ€” longer than most rooms it is played in. At that scale sound does not travel as a beam you can aim. It fills the space and reflects off every hard surface.

    When a reflected wave meets the wave that produced it, the two combine. Where crests line up, pressure adds and the note gets louder. Where a crest meets a trough, they subtract and the note weakens or disappears.

    The result is a fixed, permanent map of loud zones and dead zones, set entirely by the dimensions of the room. Change the subwoofer and the map is identical. Change the amplifier and the map is identical. The only thing that changes what you hear is where you put your head.

    One person calls the bass overwhelming while someone two metres away says there is almost none. Both are describing what they hear accurately. They are sitting in different zones of the same map.

    Where do the cancellations actually fall?

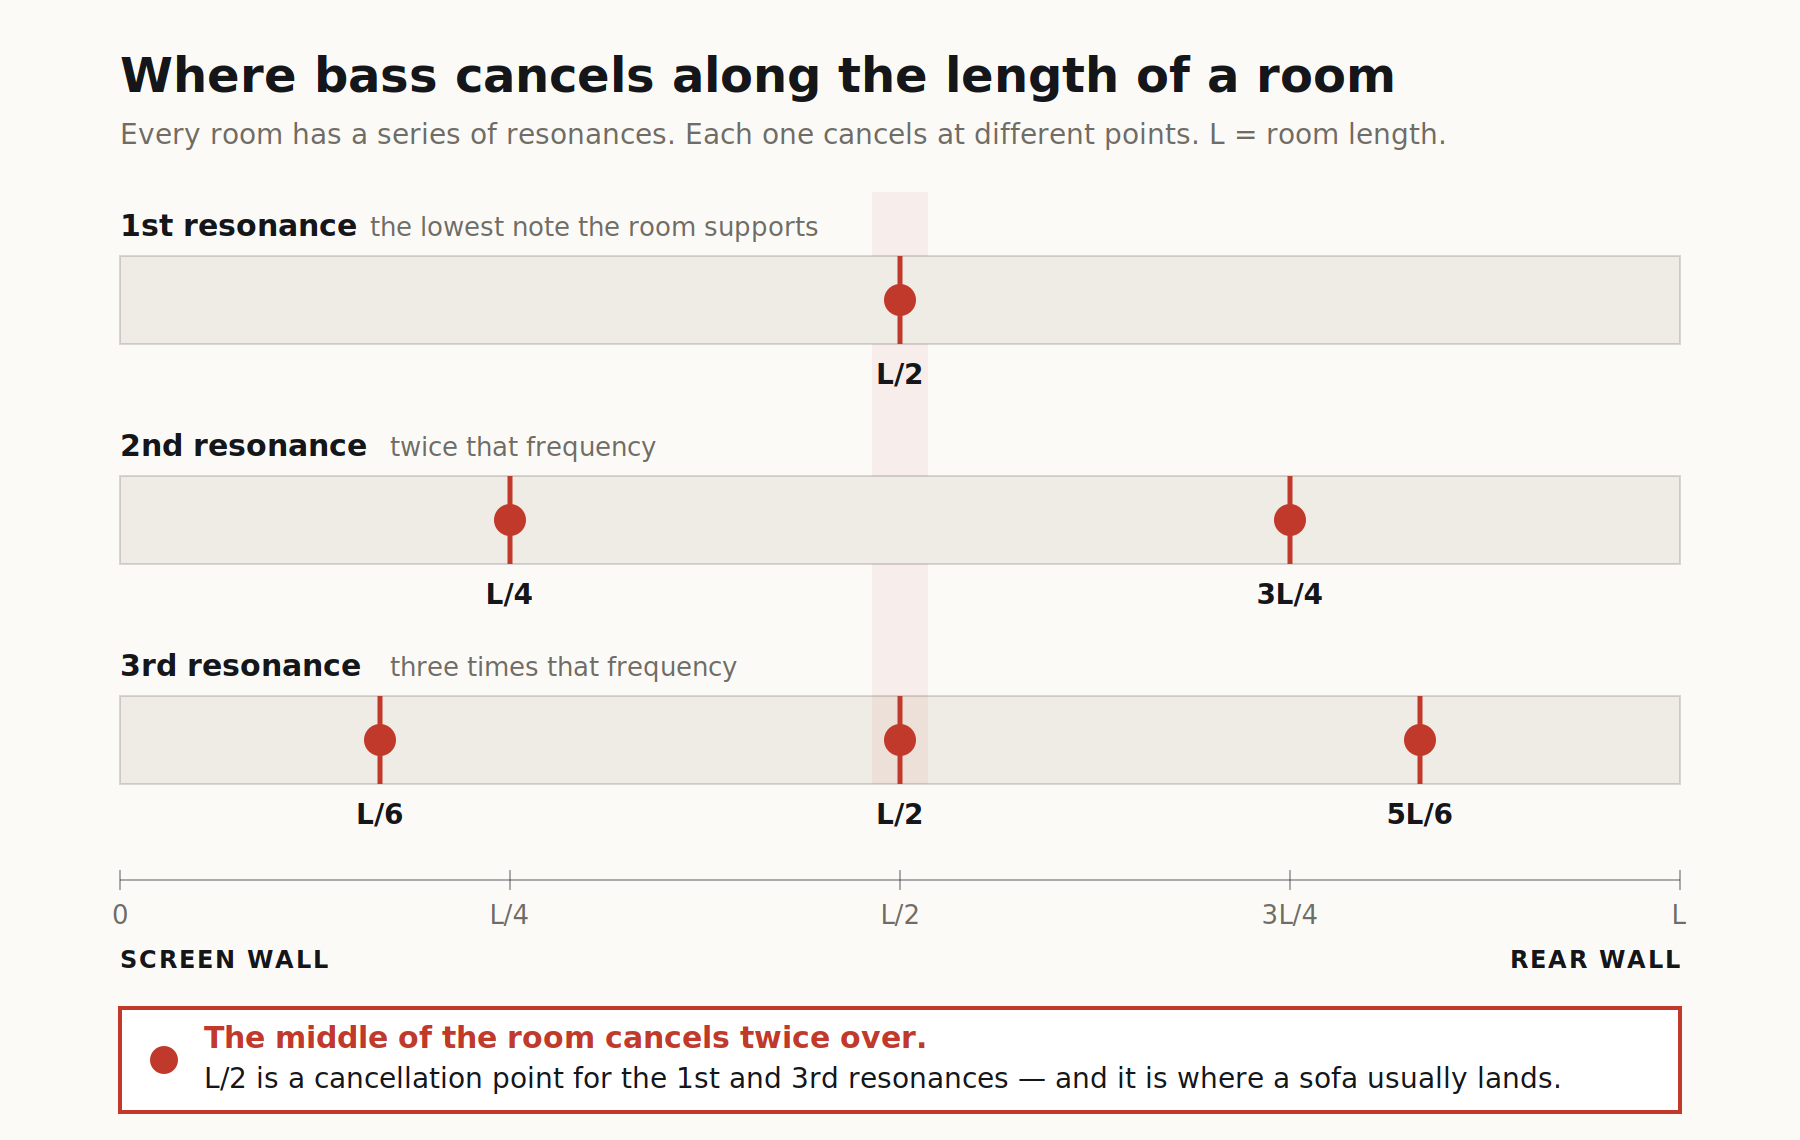
    They are not random and they are not a matter of opinion. Each room dimension produces its own series of resonances, and the first one is set by a single division.

    First resonance along any room dimension
    f = speed of sound in air 2 ร— that dimension
    A room 6.7 m long, sound travelling at 343 m/s:
    343 รท (2 ร— 6.7) = 343 รท 13.4 = 25.6 Hz
    The room then resonates again at every whole multiple:
    51.2 Hz  ยท  76.8 Hz  ยท  102.4 Hz
    Arithmetic you can check on a calculator โ€” not a measurement of any particular room.

    Each of those resonances cancels at its own set of points, and the pattern is simple.

    1st
    Cancels at the midpoint. One dead point, exactly halfway down the room.
    2nd
    Cancels at the quarters. Two dead points, at a quarter and three quarters.
    3rd
    Divides into sixths. Three dead points โ€” one lands back on the midpoint.

    Put those three on the same floor plan and the problem becomes obvious.

    Home cinema seat position diagram showing where bass cancels along the length of a room for the first, second and third resonances
    The same map applies to the width and the height of the room as well, each with its own set of frequencies. A seat that is clear on one axis can still sit on a cancellation for another โ€” which is why a seating layout is calculated on all three dimensions, not just the length.

    What does a cancellation actually sound like?

    Certain low notes arrive at that seat far weaker than they should. Nothing is broken. The system is working exactly as designed, and the seat is in the wrong place.

    • Explosions lose weight and land as a thud
    • Music sounds thin, with no body underneath it
    • Kick drums lose impact and turn into a click
    • Some bass notes are missing entirely while others are perfectly fine
    • Turning the volume up does not bring them back

    The instinctive response is to blame the subwoofer and buy a larger one. That rarely helps, because the problem is not how much energy leaves the driver. It is what survives the journey to that particular chair.

    Why is sitting against the rear wall a trap?

    This is the opposite failure, and it fools people for much longer because it sounds impressive at first.

    At a boundary, every resonance reaches maximum pressure at the same moment. On paper nothing is cancelling, which looks ideal. In the room it produces bass that is heavy, slow and much the same on every note, with the longest decay anywhere in the space.

    • Bass becomes boomy rather than deep
    • Dialogue clarity drops because low frequencies mask the midrange
    • Action scenes feel noisy instead of powerful
    • Long viewing sessions become genuinely tiring

    Too much bass is not premium bass. Good bass is deep, clean, controlled โ€” and consistent from one seat to the next.

    If your architect has already drawn the seating, the geometry is worth checking against the room’s resonances before the riser is cast. At drawing stage it costs nothing to change. After construction it cannot be changed at all.

    Send us your room drawing on WhatsApp โ†’

    Is room gain the same thing as boom?

    No, and confusing the two leads to the wrong fix. They are separate effects with separate causes.

     Room gainModal peak โ€” this is boom
    Where it happens Below the room’s lowest resonance At the resonances and above
    Mechanism Wavelength longer than the room, so the air behaves as a sealed volume being compressed Reflected waves reinforcing each other at specific frequencies
    Character Smooth, broadband rise as frequency falls Narrow, uneven, different in every seat
    Worst location Even across the room At the room boundaries
    Verdict Usually a benefit โ€” design for it A problem โ€” solve by placement and treatment

    Room gain is one reason a properly sealed dedicated room reaches lower and feels more solid than the same equipment in an open living space. It is worth designing for. It is not a substitute for correct seating, and it is not what makes a room boom.

    One point specific to Indian construction: room gain depends on how well the space is sealed. Air-conditioning penetrations, false ceilings, unsealed door frames and service openings all leak low-frequency pressure, so many rooms deliver less of it than theory predicts. Getting that right belongs in the same conversation as sound isolation, and both are construction-stage decisions.

    Can a bigger subwoofer or room correction fix a bad seat?

    Partly, and not the part that matters most.

    Equalisation raises a signal that is already present at the microphone. Where the room has cancelled a frequency there is very little arriving to raise, so boosting it consumes amplifier and driver headroom, increases distortion at high output, and can make other seats worse. Room correction is a finishing tool, not a rescue tool.

    Multiple subwoofers are the genuinely effective answer, and they work by a different mechanism. One subwoofer creates one fixed map of strong and weak zones. Several placed symmetrically create overlapping maps, so where one is weak another is delivering pressure, and the seats stop disagreeing with each other. Seat-to-seat consistency is one of the criteria the CEDIA/CTA-RP22 immersive audio recommended practice uses to define objective performance levels, which is why we design to it rather than to a subwoofer count.

    What we measure, and what it proves

    Two results from our own Krix reference room in Madurai, both taken with a calibrated microphone in REW:

    3.1 dB
    Seat-to-seat variation across six seats in our reference room, against a typical industry figure of 6 to 10 dB.
    0.64 โ†’ 0.30 s
    RT60 at 1 kHz, before and after acoustic treatment. Same room, same mic position, no EQ applied.
    15โ€“20 dB
    Typical low-frequency peaks and cancellations in an untreated domestic room at the listening seat.

    That first number is the whole argument. Seat-to-seat consistency is not a happy accident of good equipment โ€” it is the outcome of a seating plan derived from the room’s dimensions, multiple subwoofers positioned by measurement, and treatment that controls what remains. Our experience center is built to CEDIA/CTA-RP22

    It is also worth being precise about what can be known when. Room dimensions let us calculate where the problems will be before a wall is built. Only a swept measurement with a calibrated microphone tells us how severe they are, because real rooms have damping, leakage and non-rigid surfaces that arithmetic cannot see.

    A room plan predicts the problem. A measurement proves the result. Anyone quoting a decibel figure for your room before measuring it is showing you a model, not your cinema.

    What is the correct order of work?

    The sequence that works

    1. Fix the room dimensions and the seating positions. Free at design stage. Permanent afterwards.
    2. Place the subwoofers by measurement. Count and position both matter. Visual symmetry alone is not enough.
    3. Treat the room. Broadband absorption at first reflection points, corner bass traps for low-frequency decay, diffusion in the rear half.
    4. Calibrate and verify. Set crossovers, delays, levels and target curve from measured data, then re-measure to confirm the result.

    Follow that order and honest mid-tier equipment performs well above its price. Reverse it and expensive equipment disappoints โ€” which is the single most common problem we are called in to diagnose, and by then the seating is usually bolted to a riser.

    If your room is already built and the bass is uneven, look at placement and treatment before another equipment upgrade. We set that out in detail in why most home theater rooms sound worse after treatment, and the full geometry โ€” speaker angles, ear height, surround placement โ€” is covered in our home cinema speaker placement guide.

    Design the seat before you specify the system

    Better bass is not only a question of more powerful equipment. It is a question of sitting in the right place inside a room that was planned for it. Sit in a cancellation and there is not enough. Sit in a pressure peak and there is too much. Both spoil the experience, and both are decided long before the equipment is delivered.

    In Madurai and the surrounding districts our projects begin from โ‚น8 lakh. Elsewhere in South India the minimum engagement is โ‚น50 lakh, which is also the level at which genuinely reference-level performance becomes achievable. The seating geometry costs the same in every one of them: nothing, if it is decided at design stage.

    Frequently Asked Questions

    Does home cinema seat position matter more than the subwoofer?

    Below roughly 150 Hz, position has a very large influence. Room resonances create fixed zones of reinforcement and cancellation that no subwoofer can move, because they are set by the room’s dimensions rather than the equipment. A larger subwoofer raises output everywhere but does not change where the cancellations fall. Above that range, speaker quality, acoustic treatment and calibration matter more.

    Why does the middle of the room sound bad for bass?

    The exact midpoint of a room is a cancellation point for the first resonance along that dimension, and for every odd-numbered resonance above it. It is one of the weakest positions in the entire room for low frequencies, and it is where a sofa naturally lands when a room is laid out by eye rather than calculated.

    Is sitting against the rear wall good for bass?

    It gives you more bass, not better bass. At a boundary every resonance reaches maximum pressure simultaneously, producing heavy one-note bass with the longest decay in the room. Leave meaningful distance from the rear wall and treat that wall properly with absorption and bass trapping.

    Can room correction or EQ fix a bad seating position?

    No. Equalisation boosts a signal that already exists at that position. Where the room has cancelled a frequency there is almost nothing to boost, so the correction only consumes amplifier and driver headroom and raises distortion at high output. Correction is a finishing step applied after placement and treatment, not a repair for a seating error.

    Do multiple subwoofers solve room mode problems?

    They reduce them substantially. Several subwoofers placed symmetrically create overlapping pressure patterns, so a weak zone from one is filled by another and the seats become far more consistent with each other. In our own reference room in Madurai this approach, combined with a calculated seating plan and acoustic treatment, produced 3.1 dB seat-to-seat variation across six seats against a typical industry figure of 6 to 10 dB.

    What is room gain in a home cinema?

    Room gain is the smooth rise in low-frequency output below the room’s lowest resonance, where the wavelength is longer than the room and the air behaves as a sealed volume being compressed. It is broadband and generally beneficial. It is not the same as a modal peak, which is narrow, uneven, worst at the boundaries, and heard as boom.

    At what stage should home cinema seating be planned?

    At design stage, alongside the room dimensions, and before any civil work on the riser. The resonance frequencies come from the length, width and height, and the workable seating positions follow from them. Seating must also satisfy screen viewing angle and surround speaker geometry at the same time, which usually leaves a small number of valid positions. After construction, those options are largely gone.

    How much does a properly designed home cinema cost in India?

    SMART Home Cinema projects in Madurai and the surrounding districts begin from โ‚น8 lakh. For projects elsewhere in South India the minimum engagement is โ‚น50 lakh, which is also the level at which reference-level performance becomes achievable. Seating geometry costs nothing in any of these tiers, provided it is decided at design stage.

    Design Consultation ยท South India

    Send us your room before the riser is built

    Share the room dimensions and the proposed seating layout. We will tell you where the resonances fall, whether the plan is workable, and what needs to change while changing it is still free.

    Discuss Your Room on WhatsApp โ†’

    Chennai ยท Madurai ยท Coimbatore ยท Bengaluru ยท Hyderabad ยท Across South India & Pan-India projects

    Paul Joseph Klattan
    HAA Level 3 Certified | ISF Certified | Trinnov Certified
    Founder, SMART Home Cinema ยท Madurai, Tamil Nadu

    Paul designs, treats and calibrates reference-level private cinemas across South India using a measurement-driven process built on REW analysis, RT60 optimisation, multi-subwoofer integration and verified seat-averaged target curves. He operates a Krix Reference Level Experience Center in Tamil Nadu at Madurai with four demonstration environments, built to CEDIA/CTA-RP22 โ€” one of the few properly calibrated immersive audio environments in South India.

  • Home Cinema Speaker Placement Guide – 9 Critical Steps

    Home Cinema Speaker Placement Guide – 9 Critical Steps

    Home Cinema Speaker Placement Guide

    Introduction

    Designing a high-performance home cinema is not about adding more speakersโ€”it is about placing them correctly. Even premium speakers will underperform if placement, angles, and alignment are not executed with precision.

    Designing a high-performance home theater that does justice to immersive audio formats like Dolby Atmosยฎ, DTS:Xยฎ Pro, and Auro-3Dยฎ requires more than just buying high-quality gear; it requires a strategic approach to speaker placement. While these technologies all have different requirements for locating speakers beyond a standard 7.1 setup, following a logical set of rules can help reconcile these differences for an optimal experience

    This guide focuses specifically on small theaters with a single row of listeners, which represents the most critical and performance-sensitive segment in private home cinema design. The goal is to achieve reference-level imaging, tonal balance, and spatial accuracy using scientifically grounded placement principles.

    1.Defining the Reference Seating Position (RSP) or Main Listening Position (MLP)

    Before placing any speaker, establish the RSPโ€”typically the center seat in the single row.

    All speaker placement, angles, delays, and calibration decisions must be referenced to this point.

    Key Principle:

    • If the RSP is wrong, the entire system alignment will be compromised.

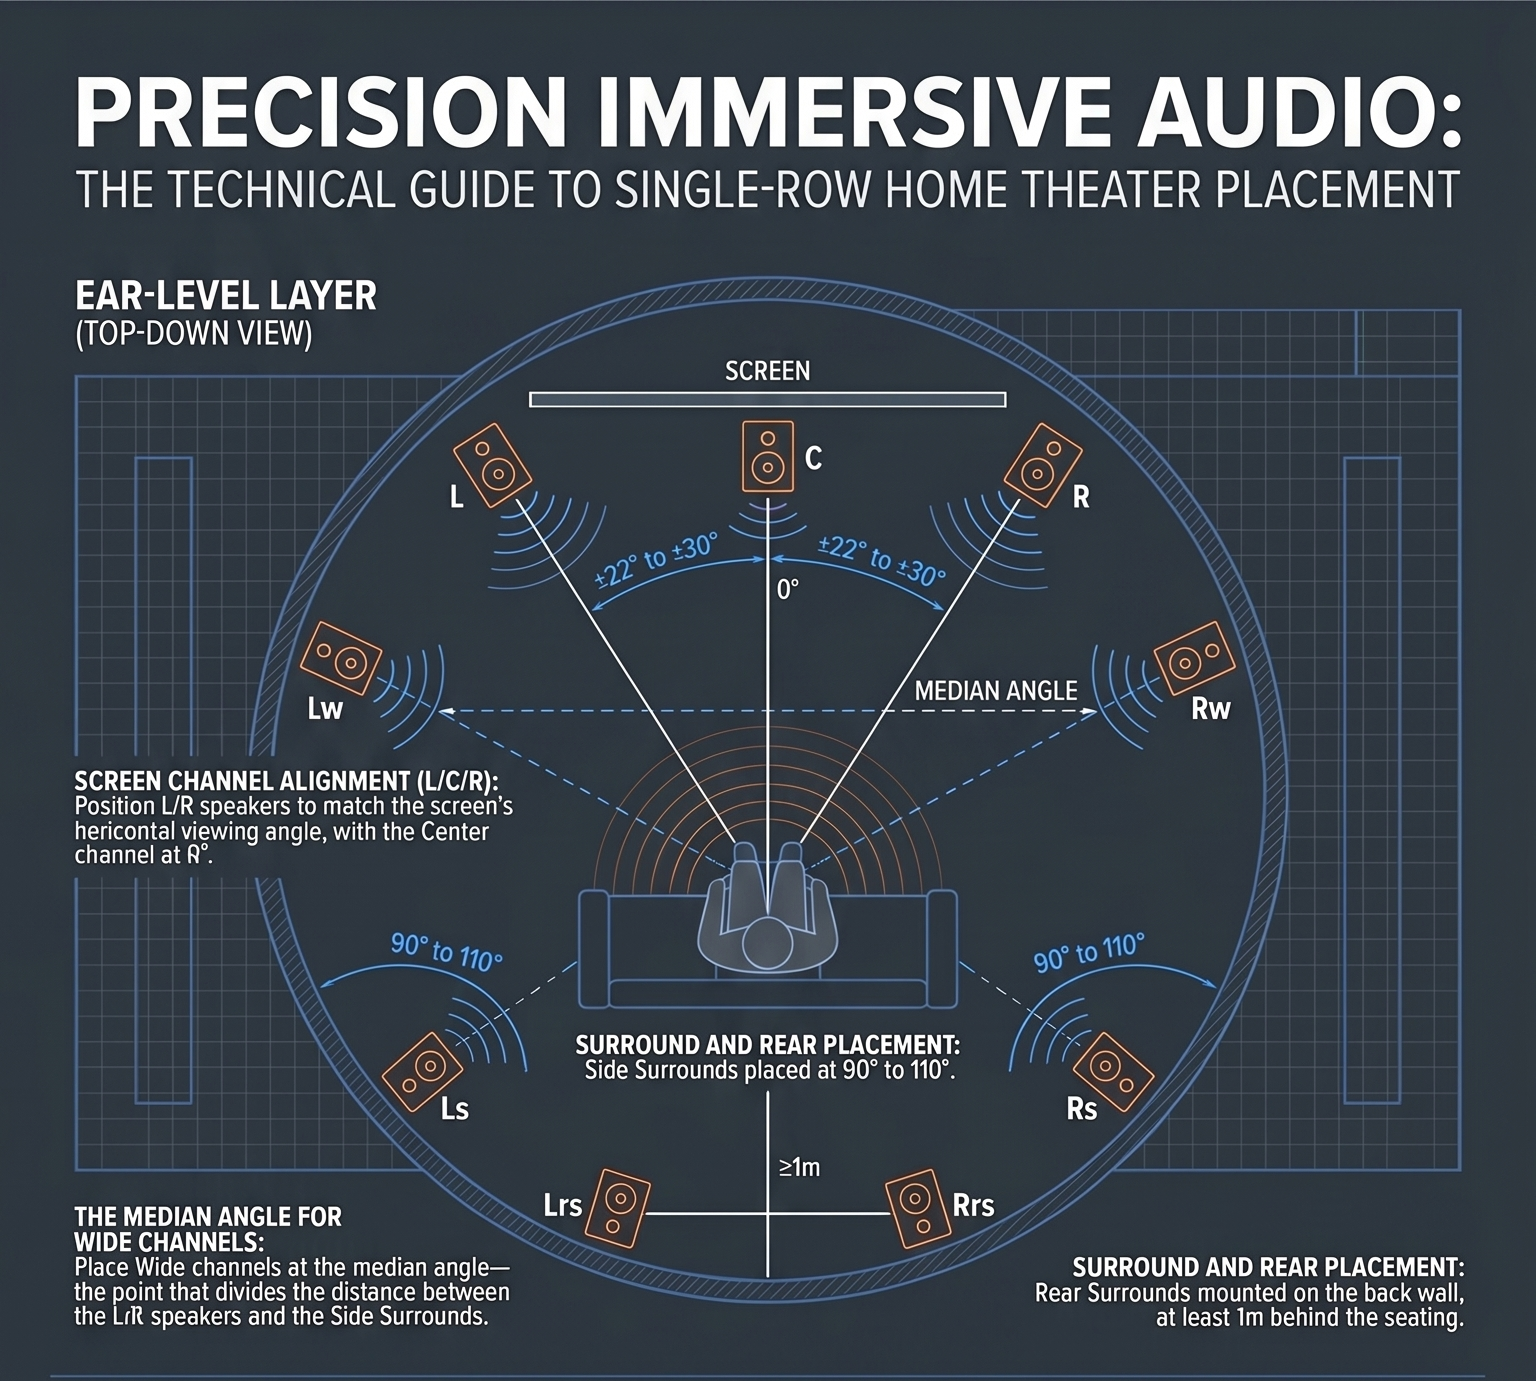
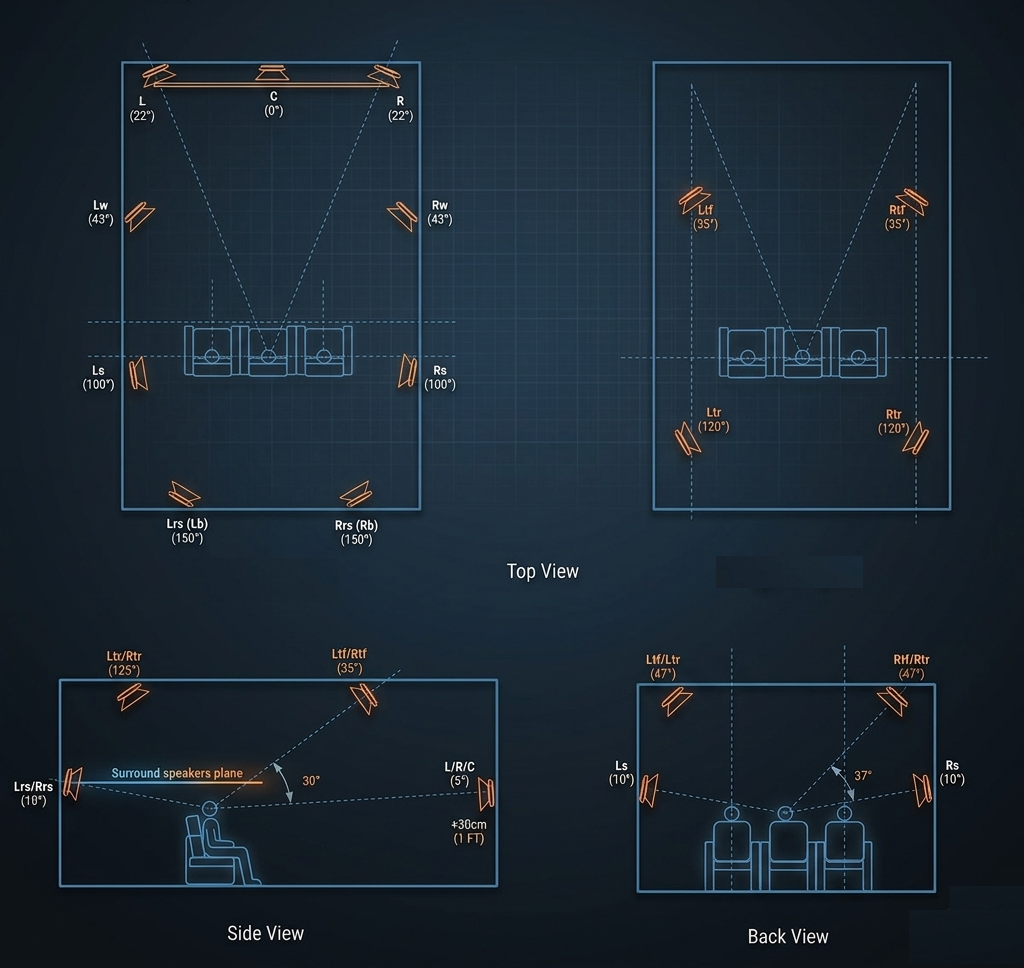
    Top view of home theater speaker placement showing 7.2.4 layout with correct angles from the listening reference point in a single-row setup

    2. Front Stage Speaker Placement (LCR)

    The front stage is responsible for dialogue clarity, imaging, and screen anchoring.

    2.1 Left and Right Speakers

    • Horizontal angle from LRP: ยฑ22ยฐ to ยฑ30ยฐ
    • Height: Tweeter aligned with ear height at RSP
    • Orientation: Directly aimed at the listener (toe-in required)

    Why this matters: Proper angular separation ensures accurate stereo imaging and seamless panning across the screen

    2.2 Center Channel

    • Position: Exactly at 0ยฐ (center of screen)
    • Height: Ideally same acoustic height as L/R tweeters
    • If placed below screen: apply upward tilt toward ear level

    Critical Note: The center channel must not be treated as secondaryโ€”it carries the majority of dialogue and must match tonal characteristics of L/R.

    2.3 Acoustically Transparent (AT) Screen Advantage

    For best results:

    • Place LCR speakers behind an acoustically transparent screen
    • Maintain identical height and alignment across all three speakers

    This creates a true cinematic experience where sound originates from the screen itself

    3. Subwoofer Placement (Low Frequency System)

    Low frequencies are highly affected by room modes, making placement critical.

    • Minimum: 2 subwoofers
    • Ideal placement for small rooms:
      • Front wall (symmetrical)
      • Midpoints of opposing walls (if feasible)

    3.2 Key Objective

    • Achieve uniform bass response at RSP
    • Minimize peaks and nulls caused by room interaction

    Important: Subwoofer placement must be validated through measurement (REW or equivalent)โ€”visual symmetry alone is not sufficient.

    4. Surround Speaker Placement (Side Surrounds)

    Surround speakers create envelopment and spatial immersion.

    4.1 Placement Guidelines

    • Angle from RSP: 90ยฐ to 110ยฐ
    • Height: Ear level to +20 cm (slightly above ear height)
    • Orientation: Direct or slightly diffused depending on speaker design

    4.2 Distance Consideration

    • Maintain equal distance from RSP where possible
    • Avoid placing too close to listeners to prevent localization

    Key Insight: In a single-row theater, side surrounds must balance localization vs envelopmentโ€”too direct feels distracting, too diffuse reduces immersion.

    5. Overhead / Height Speaker Placement (Atmos Layer)

    Height speakers add the third dimension (vertical immersion).

    • Minimum: 2 (Top Middle)
    • Preferred: 4 (Top Front + Top Rear)

    5.2 Placement Angles

    • Top Front: 30ยฐ to 55ยฐ in front of RSP
    • Top Rear: 30ยฐ to 55ยฐ behind RSP

    5.3 Alignment

    • Maintain symmetry across left and right channels
    • Ensure equal distance from RSP for time alignment accuracy

    Important: Height speakers must not be placed randomly on the ceilingโ€”incorrect placement destroys spatial accuracy.

    Elevation view of speaker placement showing height channels and listening ear level alignment in home theater

    6. Speaker Distance, Delay & Time Alignment

    Physical placement alone is not enough. All speakers must be:

    • Distance matched to RSP
    • Delay aligned using processor/DSP
    • Phase coherent with subwoofers

    Outcome:

    • Accurate arrival time
    • Precise imaging
    • Cohesive sound field

    7. Acoustic Considerations (Non-Negotiable)

    Speaker placement works only when supported by proper acoustics.

    7.1 First Reflection Points

    • Treat side walls and ceiling reflection points
    • Prevent comb filtering and imaging blur

    7.2 Bass Control

    • Use bass traps to manage low-frequency decay
    • Target controlled RT60 values

    7.3 Front Wall Treatment

    • Absorptive or baffle wall design improves:
      • Clarity
      • Low-frequency integration7.3 Front Wall Treatment

    7.4 Why Most Indian Home Theater Rooms Struggle with Acoustics

    Acoustic treatment is often misunderstood and incorrectly implemented in many home theaters. In fact, improper treatment can degrade performance by over-absorbing critical frequencies or ignoring low-frequency behavior. If you want a deeper technical understanding of why this happens, read our detailed analysis on why most treated rooms fail to deliver accurate sound reproduction:
    https://smartcinemas.in/blog/why-most-home-theater-rooms-sound-worse-after-treatment/

    8. Common Mistakes to Avoid

    • Placing speakers based on room convenience instead of angles
    • Ignoring ear height alignment
    • Using a single subwoofer in a critical listening room
    • Incorrect surround height (too high or too low)
    • Random Atmos placement without angular reference
    • Skipping measurement and calibration

    9. Final Calibration (Critical Step)

    After placement:

    • Perform acoustic measurements (REW, etc.)
    • Adjust crossover, delay, and EQ
    • Validate frequency response and time alignment

    Result: A system that is not just installedโ€”but engineered and verified.

    Conclusion

    In a small home theater with a single row, precision matters more than scale. Proper speaker placement ensures that every seatโ€”especially the reference seatโ€”delivers a balanced, immersive, and accurate cinematic experience.

    This is the difference between:

    • A room with speakers
    • And a reference-level home cinema

    FAQ

    What is the most important reference point for speaker placement in a home theater?

    The Reference Seating Position (RSP)โ€”typically the center seat in a single-row theaterโ€”is the most critical factor. All speaker angles, distances, delays, and calibration must be aligned to this point to achieve accurate imaging and tonal balance.

    Why are speaker angles more important than room symmetry?

    Room symmetry alone does not guarantee correct sound reproduction. Angular placement relative to the LRP (e.g., ยฑ22ยฐโ€“30ยฐ for L/R, 90ยฐโ€“110ยฐ for surrounds) ensures proper sound staging, imaging, and panning accuracy, which are essential for a reference-level experience.

    Can I achieve good bass performance with a single subwoofer?

    In most rooms, a single subwoofer leads to uneven bass response with peaks and nulls. Using at least two subwoofers, properly placed and calibrated, helps achieve consistent low-frequency performance at the listening position

    How high should surround speakers be in a single-row home theater?

    Surround speakers should be placed at ear level or slightly above (up to ~20 cm). Placing them too high reduces envelopment and creates a disconnected sound field, especially in a single-row setup

    What is the biggest mistake in Dolby Atmos speaker placement?

    The most common mistake is random ceiling placement without angular reference. Height speakers must follow defined angles (typically 30ยฐโ€“55ยฐ from the listener) to create accurate vertical imaging and proper 3D sound movement.

    Is speaker placement enough, or is calibration also required?

    Speaker placement is only the first step. A true home cinema requires measurement-driven calibration, including:
    Distance and delay alignment
    Crossover optimization
    Frequency response correction
    Without calibration, even correctly placed speakers will not perform at their full potential.

    What happens if surround speakers are placed too close to the listener?

    If placed too close, surround speakers become localized, breaking immersion. Proper distance and level calibration are required to maintain an enveloping sound field

    How important is toe-in for front speakers?

    Toe-in is critical for achieving accurate imaging and high-frequency clarity. Speakers should typically be aimed directly at the Listening Reference Point for optimal performance.

    Should front speakers be placed behind an acoustically transparent screen?

    Yes, placing LCR speakers behind an acoustically transparent screen ensures proper alignment with on-screen visuals, creating a more realistic and immersive cinematic experience.