The drawings, the predicted result and the limits of treatment, shown on a real room.
Home theatre acoustic treatment is planned on paper before a single panel reaches the wall. A proper layout shows you what goes where, why it goes there, and how the room is expected to sound once it is done.
If the plan you have been given is a panel count and a mood board, the most important part of the design is still missing.
This article walks through what a complete treatment layout contains, using the real drawings from a sample room designed in our design app. The same drawings are what you should expect to see, and question, before your room is built.
What is a home theatre acoustic treatment layout?
A home theatre acoustic treatment layout is a set of measured drawings that shows every absorber, diffuser and bass trap in your room, with its exact position on each wall and the ceiling. It is backed by a prediction of how the room will sound, band by band, once those panels are in place.
It is different from a product list. A product list tells you what to buy. A layout tells your installer where each panel goes, to the inch, and tells you what the room should measure after installation. That is the document you can hold a project to.
Why does the layout matter more than the number of panels?
The same number of panels can make a room sound clear or dull, depending on where they go. Absorption placed at the wrong points leaves strong early echoes untouched. Too much absorption in one band leaves the room lifeless. The layout, not the count, decides the result.
Three placement decisions do most of the work:
- First reflections. Sound from the front speakers bounces off the side walls and ceiling and reaches your ears a fraction of a second after the direct sound. Treating those reflection points keeps dialogue clear and the image stable. How first reflection points decide panel placement.
- Corners and wall–ceiling junctions. Low-frequency energy builds up where room surfaces meet, so bass traps go there.
- Diffusion on the walls and ceiling. Diffusers scatter sound instead of absorbing it, which keeps the room sounding open and enveloping rather than dead.
What should the drawings show?
A complete layout has five drawings and one prediction sheet: a ceiling plan, four wall elevations (left, right, front and rear), and a predicted RT60 by octave band. Every panel should be dimensioned from the floor and from the adjacent walls, so the installer marks positions with a tape measure instead of deciding them on site.
Check each drawing for these points:
- Ceiling plan: absorbers over the seating reflection zone and the ceiling diffusers, each row dimensioned from the front wall
- Side-wall elevations: the first-reflection zone marked, and panels placed to cover it
- Front-wall elevation: bass traps in the corners, with absorption behind the screen, near the front speakers
- Rear-wall elevation: panels starting above the riser platform, so they sit at seated ear height
- Prediction sheet: reverberation time for each band from 125 Hz to 4 kHz, with the panel count it is based on
RT60 is the time sound takes to fade by 60 dB after it stops. One RT60 number for the whole room hides problems. A room can sound controlled at 1 kHz, still boom at 125 Hz, and sound dull at 4 kHz. That is why the prediction must show every band. See a measured RT60 case study.
What does a real layout look like?
Our sample room is 13′6″ wide and 22′6″ long (4.11 × 6.86 m), with a 9′4″ (2.84 m) gypsum false ceiling under a 10′0″ slab. It has 304 sq ft (28.2 m²) of floor, 2,835 cu ft (80.3 m³) of volume, brick and plaster walls, and six recliners in two rows.
The design works in a fixed order:
- Room proportions are checked first. This room passes: its resonant frequencies are evenly spaced, so bass notes do not bunch together and boom as a group.
- Seating comes next. Row 1 sits 10′1½″ (3.09 m) from the front wall and Row 2 sits 15′3½″ (4.66 m) from the front wall, on an 11″ (280 mm) riser.
- Treatment is placed last, against those seats.
The finished layout uses 68 panels, each 600 × 600 mm:
| Panel | Role | Quantity |
|---|---|---|
| Curve 75 | Absorber: front wall, rear wall centre, ceiling | 16 |
| BigWave 80 | Absorber: side walls | 18 |
| 3DFuser 160 | 3D diffuser: walls and ceiling | 17 |
| BigWave 250 | Bass trap: corners and wall–ceiling junctions | 17 |
| Total | 68 |
Panel schedule for the sample room.
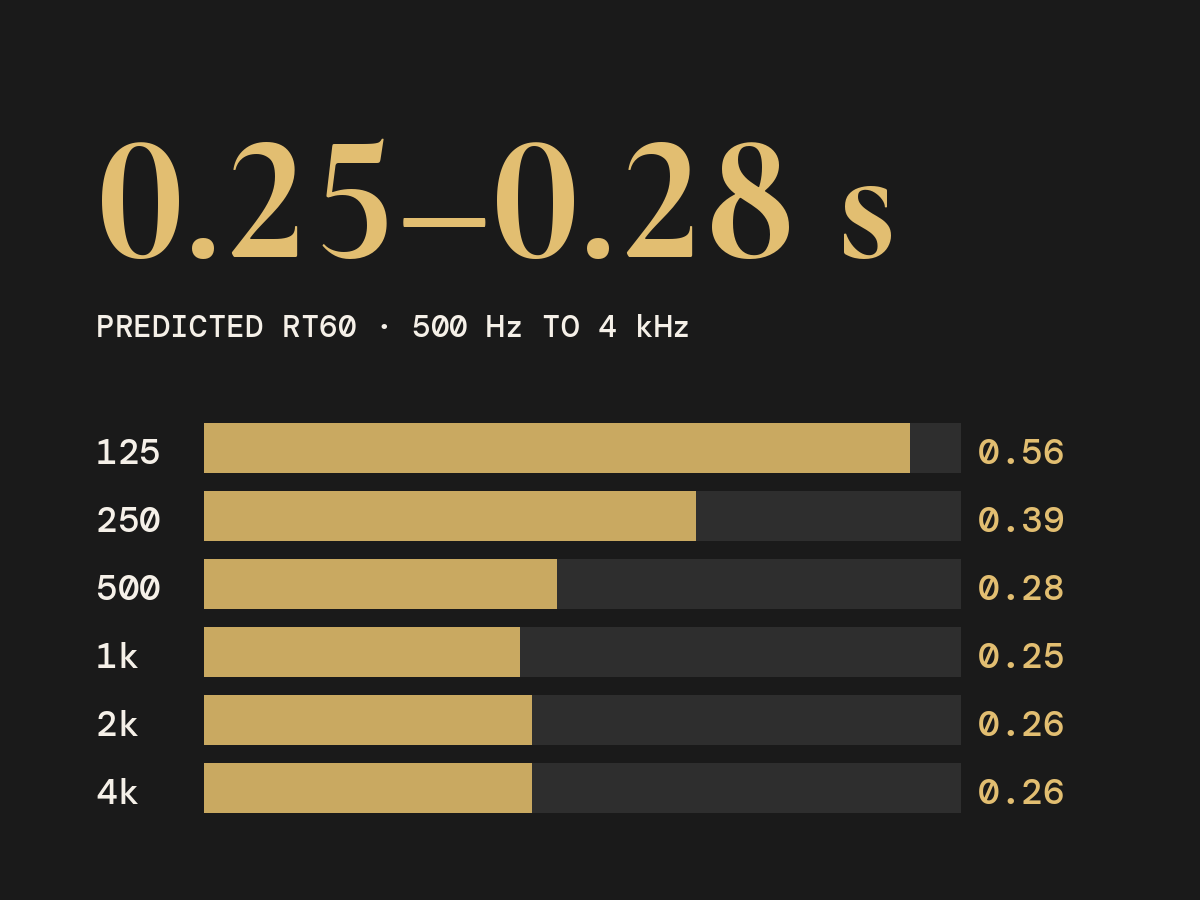
The predicted reverberation time, with this treatment in place:
From 500 Hz upward, the prediction is even, at 0.25 to 0.28 seconds. That is where dialogue clarity and detail live. The 125 Hz band stays the highest, which is normal for a brick-and-plaster room and is the subject of the next section.
What can acoustic treatment fix, and what can it not fix?
Acoustic treatment controls reflections and reverberation. It keeps dialogue clear, stops the room sounding harsh or echoey, and makes the sound even across seats. It does not, on its own, fix uneven bass. Low bass depends as much on room proportions, seat positions and subwoofer placement as on panels.
Brick and plaster walls absorb almost no low-frequency sound, so Indian rooms hold bass longer than rooms built with gypsum partitions. Panels help, and the bass traps in this layout are placed where they do the most work. In a bass-managed system, though, everything below the crossover is reproduced by the subwoofers, so bass at each seat is shaped by where the subwoofers sit, where the seats sit, and how the system is calibrated.
That is why our design checks room proportions and seating before treatment, and why every room is calibrated after installation. Why many rooms sound worse after treatment.
Why does the layout include diffusion and not only absorption?
Absorption alone controls echoes but can leave a room sounding dull and closed in, especially at high frequencies. Diffusers scatter sound across the room instead of removing it. Placed on the walls and ceiling, they let sound surround you naturally, as it does in a real space, while reverberation stays controlled.
This is why a layout must be followed exactly. Each wall is installed to its own elevation drawing, and the side walls are not always identical. An installer who rearranges panels by eye undoes decisions that were made for a reason. The drawings remove that guesswork: every offset is dimensioned, and every panel has a position.
When should the treatment layout be prepared?
Prepare the treatment layout before the false ceiling, AC ducting and electrical points are finalised. Panel positions affect where lights, AC grilles, switchboards and conduits can go. Changing them after the ceiling is closed is costly, and some compromises cannot be undone.
The practical order for a dedicated room:
- Room dimensions and construction details confirmed with your architect
- Seating, screen and speaker positions fixed
- Treatment layout and RT60 prediction prepared
- False ceiling, AC and electrical coordinated around the layout
- Treatment and system installation, about 15 working days for on-wall treatment and the system
- Calibration, then measurement to confirm the result
Frequently Asked Questions
What is a home theatre acoustic treatment layout?
It is a set of measured drawings showing every absorber, diffuser and bass trap in the room, with its exact position on each wall and the ceiling, backed by a band-by-band prediction of how the room will sound.
What drawings should a treatment layout include?
A ceiling plan, four wall elevations and an RT60 prediction sheet. Every panel should be dimensioned from the floor and from the adjacent walls.
Why is RT60 shown band by band?
Because one number hides problems. A room can be controlled at 1 kHz, boom at 125 Hz and sound dull at 4 kHz. The prediction should show each band from 125 Hz to 4 kHz.
Will acoustic panels fix bass problems on their own?
No. Low bass depends as much on room proportions, seat positions and subwoofer placement as on panels. Bass traps help, but they work alongside correct placement and calibration.
Why include diffusion and not only absorption?
Absorption alone can leave a room sounding dull and closed in at high frequencies. Diffusers on the walls and ceiling let sound surround you naturally, while reverberation stays controlled.
When should the treatment layout be done?
Before the false ceiling, AC ducting and electrical points are finalised, because panel positions affect where lights, grilles, switchboards and conduits can go.
How long does installation take?
On-wall acoustic treatment with system installation takes about 15 working days. A custom reference-level cinema takes about 60 days, and up to 90 when civil work is involved.
What does a planned home cinema cost?
Complete home cinemas start from ₹8 lakh in Madurai and the surrounding districts, and from ₹20 lakh in Tiruchirappalli, Coimbatore, Tiruppur and Salem. Reference-level home cinemas across South India start from ₹50 lakh, and cost rises steeply with room size.
How do we design your room?
We design every room from its real dimensions and construction, not from a size band. You share your room dimensions, ceiling build, wall build, seating plan and screen preference. We return the seating plan, speaker positions, the full treatment layout and the RT60 prediction, and the same layout guides installation and calibration.
Our Krix Reference Level Experience Center in Madurai lets you hear what a planned room sounds like before you commit to your own. Paul Joseph Klattan, HAA Level 3 certified, leads the design and calibration of every project. See how we approach acoustic treatment.
Plan your room before it is built
Share your room dimensions and we will tell you what your treatment layout needs.
Discuss Your Project on WhatsApp →